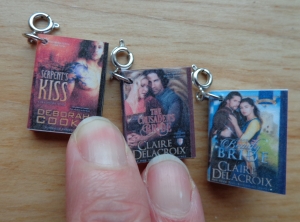
 Book charms are adorable and readers love them. I’ve bought them in the past from Etsy vendors, but when I realized I needed at least 100 of them for Romancing the Capital in August 2017, I decided to try making my own.
A big part of this decision was that I found little blank books in the dollhouse section at the craft store. They have paper pages and little covers, which are so much more realistic than book charms made of clay. 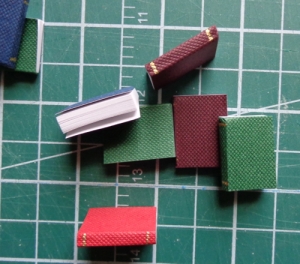 Since these look like little hardcover books, I decided to make slipcovers for them (instead of just gluing my front cover on the book). This is, of course, the Hard Way, but I think the result is worth the trouble.
The tricky bit is getting the proportions right on the printed slip cover. I measured around the book and created a template (using the free online graphics software Canva). I started with the POD cover of one of my books since that image is a full wrap. (That means it includes the spine and back cover.) Remember that you need to have the right to work with the copyrighted cover image. If you’re indie-published and paid for the cover, you’ll likely have that right. If your book was published by another publisher, you might not. Be sure to check.
My POD covers are PDF’s, but Canva doesn’t work with uploaded PDF images. (Your application might.) So, I opened the PDF on the largest computer screen in the house and took a screen shot of it—which gave me a JPG to upload. The proportions are different between the actual book and the book charm: the spine is thicker on the mini-book. I tried a number of solutions, but the best one turned out to be this: I cropped the front cover and positioned it, then did the same for the back cover. I cropped only the title from the spine—it’s usually a third or half the height of the spine—then made it large enough to fill the height. This also made it much wider and helped with that blank space. This also made it much wider and helped with that blank space. The resolution diminished, but these will be tiny when they’re printed.
 With some covers, I was able to size the front and back larger than the trim size without losing any type. This made the recognizable cover image larger. When possible, I also chose a colour for the background on the template that would blend into the actual book cover image.
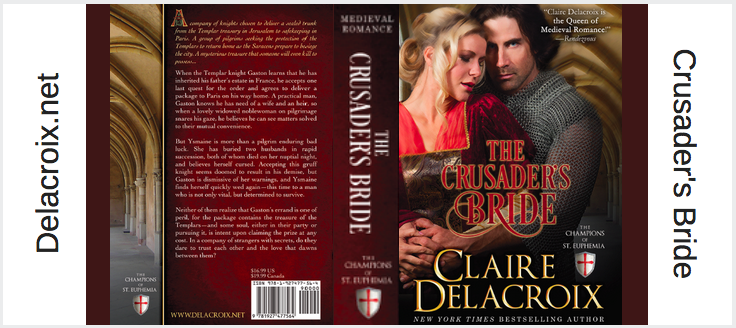
Also, because I made a slipcover, I had endpapers, which meant locations for more information. This was part of my diabolical plan. On book charm covers, the type is really small and often illegible. Plus I like having my website url on everything I use for promotion. I put my website url on one endpaper and the book title on the other. Above and below are screenshots of the finished slipcovers for two of my books.

You can see that the spine for Wyvern’s Mate is much wider than that of The Crusader’s Bride. It’s actually a bit too wide and laps onto the front and back of the book charm. These print books are a different trim size with a more vertical orientation—you can also see that the front and back covers are more narrow than those of TCB—so compromises are necessary.
These images are JPGs because they’re screenshots, but you want to save or download these little covers in the format PDF for print. You can see that there’s a band of the background colour at the right and left. These images are over 700% of actual size, so a lot of that type isn’t going to be legible on the book charms.
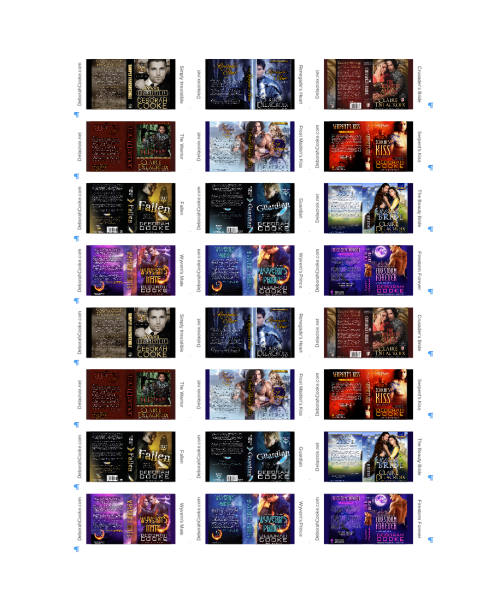 Once the slipcover images were downloaded, I used a Word document and Inserted Picture from File so that the covers were three across. I got eight rows on the page. If you’re like me and use cheap paper in your printer on a daily basis, you might want to invest in a smoother and whiter grade of paper stock. You will use up printer toner with this project if you’re making any quantity of charms, so get a toner refill while you’re at the office supply store.
Above is a sheet of covers. You can see that it’s two sets of twelve: I set up the top twelve, then selected all, copied and pasted to fill the page. There’s a space between each cover horizontally and a return between each row vertically.
To ensure that the image didn’t rub off or get scuffed up on the finished book charm, I wanted to seal it before attaching it to the book charm. I was looking for a full adhesive sheet to laminate one side and am glad I didn’t find it—it’s really, really difficult to put down a large sticky sheet of laminating material without getting a fold or a bubble. I used clear Avery Labels (intended to be used for shipping labels – Avery 7664) as my laminate. There are six labels on a page and a label will cover six book covers, but I found that working smaller was easier. I cut each label in half, which is enough for three book covers, touched down one edge then smoothed it across the covers. Fast. Practice makes perfect! I used a burnisher to make sure it was smoothly applied.
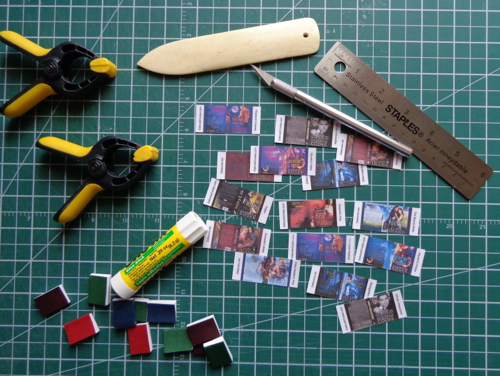 Next, cut the book covers apart. If they’re lined up perfectly, this is pretty easy to do with a cutting mat, straight edge, and an X-acto knife. Once mine were cut, I folded down the front end paper, then wrapped one cover around one book before folding down the back end paper. (The books do vary a little bit in size, so you need to match cover to book, one at a time.) Once everything looks good, glue the endpapers to the inside book cover. They’re the same kind of paper, so it should make the best seal and I like that the slipcover lifts off the outside of the book a bit, like a real slipcover. I used a small gluestick, which minimized the chance of my getting glue in the wrong place. Put a weight on the book or clamp it until it dries.
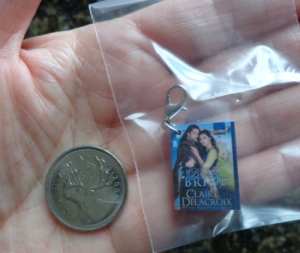 Mr. Math has a Dremel drill press, so he drilled little holes in my little books once they were dry. I put a jump ring on each one, then since these are charms for a bracelet, I added a clasp before closing the jump ring. This makes it easier for readers to add the charm to their bracelet at the event. The finished books each get their own bag. (The dollar store will be your friend with this project.)
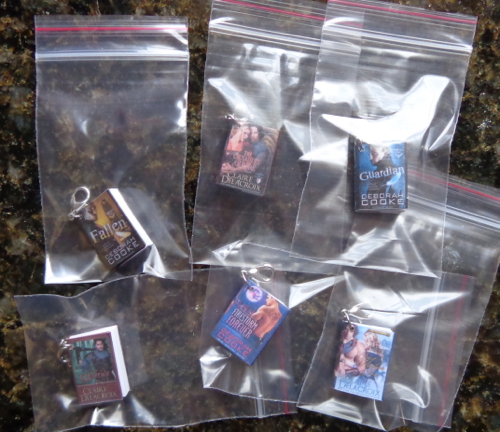 When I posted on Facebook that I was making book charms, readers became quite excited. When I showed the finished charms, some people wanted to buy them—which is a mark of very good swag! I’m going to add a page for with charms to my online store. Stay tuned!


what a great idea! you are so talented, Not only can you write an awesome book, but you are a truly talented artist!! I love them,,,
LikeLike
You are a crafty woman (pun intended)
LikeLike
LOL Sue!
LikeLike
A lot of work for you but they’re sooooo cute 😀 Can’t wait to see them in person at RTC.
LikeLike
I can’t remember if you quilt (I know you do lots of crafts). If you have a rotary cutter for fabric, you could use that instead of your X-actor knife for cutting. Supposedly paper dulls the blade and makes it harder to cut fabric – I haven’t realized seen that myself, but you could keep a separate blade just for paper, if you choose.
I love it when you share your crafty creativity!
LikeLike
I do quilt, Annie, and used my cutting mat and gridded ruler for cutting the covers. I didn’t want to cut paper with my rotary cutter, though, because it would dull it quickly. X-acto knife blades are much cheaper.
LikeLike
so wonderful
LikeLike
I’m in awe of your patience, Deb. Since I am not the least bit crafty, I’d like to know where on Etsy you can buy custom made charms like this. I’ve exhausted all avenues of search there and would like to get some made for my books.
LikeLike
I was part of a group order placed through this Etsy shop, Anna. So, I didn’t place the order or deal with the artist, but the charms were lovely.
https://www.etsy.com/ca/shop/TheBookSwagShop
LikeLike
I am SO impressed!
LikeLike
Pingback: ATTENTION MARKETING: Book Charms | Kobo Writing Life
I looooove my Ty charm! It came out great, I know how much work goes into doing them and because you did it, makes it even more memorable, You ROCK !!!
LikeLike
These little guys sure were a lot of work, but are just adorable!
LikeLike
Pingback: Making Book Charms | KATHY'S PENSCRATCH
Very nice and well explained
LikeLike
I’m very excited and am interested in buying some if they become available
LikeLike
Pingback: Updates And A Giveaway – The Blood Inheritance Quartet